There are plenty of possible causes of fault that we simply do not wish to think of, or that we cannot imagine. However, and this is always true, it is cases like this that draw our attention to potential weaknesses, and guides us towards insights about what we need to do.
We had a customer whose vacuum lifter would not release from the glass pane any longer. Naturally enough, this was one of the larger devices for use on construction sites, and it had four separate vacuum circuits. Since this vacuum lifter had a remote control, we immediately thought of looking at the electrical system and at the solenoid valve. However, replacing the solenoid valves did not lead to success. Nor was activation of the solenoid valves the issue. As a result Hotline Support fairly quickly ran out of ideas. So in the hope of guiding you towards the right idea more quickly, we can advise you of the following.
We went to look at this device for ourselves, and initially we were unable to discover anything useful because we suspended the vacuum lifter and simply switched it between SUCTION and RELEASE. It was possible to connect all suction cups on the device to the vacuum systems using quick-release hose couplings. For the test, we separated all suction cups from the vacuum supply and then we began our test. What could the problem here be? The vacuum meters immediately showed that vacuum was diminishing or cancelled altogether. Yes, the vacuum systems were leaking, causing vacuum to be lost. However, that bore no relation to the fault being described by the customer.
Vacuum lifter does not release
Idea:
The dirt filter is contaminated and therefore clogged. Accordingly, the dirt filters on all four vacuum circuits were checked. All of them were clean.
Then, for the first time, we looked for the leaks and remedied them.
Then we attached a control vacuum meter to the the quick-release hose couplings and repeated the test. Here too, the vacuum lifting device behaved as it should. The vacuum was built up during the SUCTION process and vacuum was released immediately after the RELEASE command.
No fault exists there!
Nevertheless, the vacuum lifting device was not willing to release the glass.
Next we checked the individual vacuum circuits for leaks which enabled us to say “everything is OK”. First vacuum circuit connected to the vacuum system and a plate for sealing, located in front of each suction cup. All good. Everything looked normal. Now the first extension is connected. The vacuum drops slightly. The plates are attached by suction.Adhesion is only performed by contact pressure.
Something has to be wrong here.
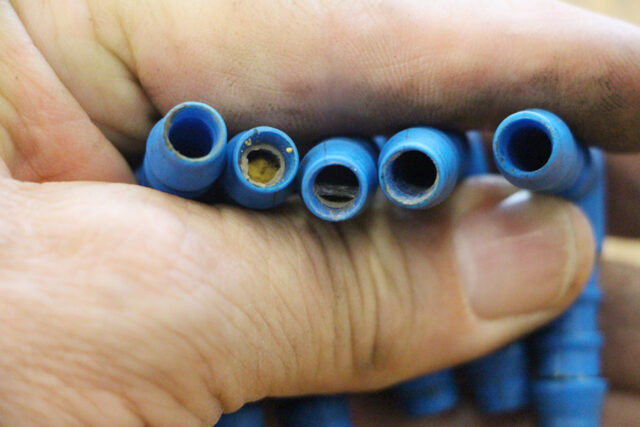
Quite right, as disassembly progressed, it was discovered that no air was getting through. The first location was the connection nipple for the suction cup and even the hose was affected. We then connected each suction cup briefly to the vacuum system and checked the corresponding reaction. Normally, vacuum is reduced immediately to zero and the warning signal is generated. Our vacuum lifter has a loud warning sound that cannot be overheard.
The individual test of suction cups enabled us to check their function very rapidly.
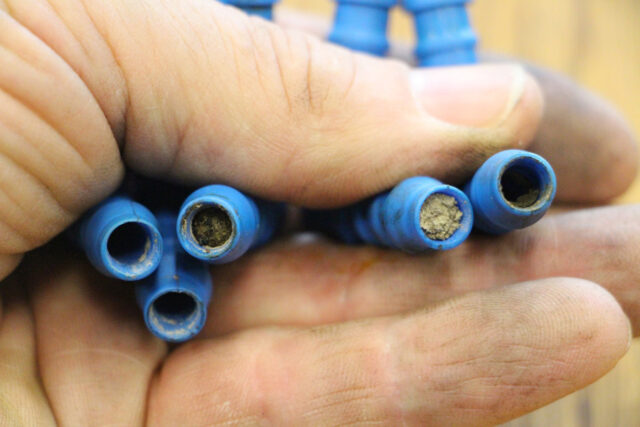
The outcome was that approx. 50% of suction cups were found to have vacuum supply lines clogged to a greater or lesser extent. Primarily, it was the angled connection nipple for suction cups that was affected, as were hoses with plug-in nipples. Not everything could be detected from outside the unit. It would appear that this device and its suction cups had been placed in muddy water.
SIt would appear that dirty water was drawn in by the vacuum lifter, causing sediment to build up in the hose nipples.
SIt would appear that dirty water was drawn in by the vacuum lifter, causing sediment to build up in the hose nipples.
Vacuum action distributes fine particles throughout the entire system. This in turn gave rise to defects on the couplings that then developed leaks. A small lack of attention to detail when working with a vacuum lifting device therefore gave rise to a relatively significant damage incident.
Fault detected!
The consequences for use:
- Due to the restriction in the system, a few suction cups needed a long time to apply suction or to release.
- With the vacuum supply line completely closed, pressure was applied to the suction cup, creating a vacuum inside it, not one strong enough to carry anything, but too high to release. A suction cup 388 with sealed vacuum connection of this kind can, when horizontal, easily achieve a tear-off force of more than 22 kg. And if you wish to move away suspended devices, this seldom happens upwards, so when the device moves horizontally, the full force of the device comes into effect. With the vacuum lifter with its 24 suction cups and about 50% of its suction cups sealed, a retaining force in excess of 250 kg can quickly be achieved.
- All plug connections and valves can get damaged by loose particles.
What have we learned from this?
The vacuum lines always need to be checked at the same time. This is best done before each time in use, and at least every four weeks. If you have a vacuum lifter with individually lockable suction cups, this is a quick process. Simply unlock all of the suction cups, then set the device to SUCTION. Now briefly connect each suction cup to the vacuum system. The warning signal for loss of vacuum must always sound immediately. Which makes this a very quick method for testing. However, first of all, this defect needs to be detected.
In the interests of safe operation of a vacuum lifter and your health, you should incorporate a test of this kind on a regular basis.